Sewing is a valuable skill that has been passed down for generations. Designing and stitching a designer blouse at home can be a very fulfilling project, especially for beginners who are just starting to explore their creative side. It also gives complete freedom to design a blouse according to one’s taste and style. For convenient online blouse stitching, consider Silailor.
In this blog, we will guide you through the entire process of cutting and stitching of designer blouse, so that even if you’re a complete beginner, you can make a designer blouse at home.
Essential Tools and Equipment for Sewing a Blouse
Before discussing the whole process of sewing a blouse, it is necessary to have all the required tools and equipment on hand to ensure a smooth, efficient process. Here is a list of the fundamental tools and equipment needed to sew a blouse:
- Sewing machine
- Thread
- Fabric
- Fabric scissors
- Pins & Needles
- Measuring tape
- Iron and ironing board
- Seam ripper
- Pattern paper
- Embellishments
- Ruler or straight edge
- Fabric chalk or marking pen
- Hand-sewing needles
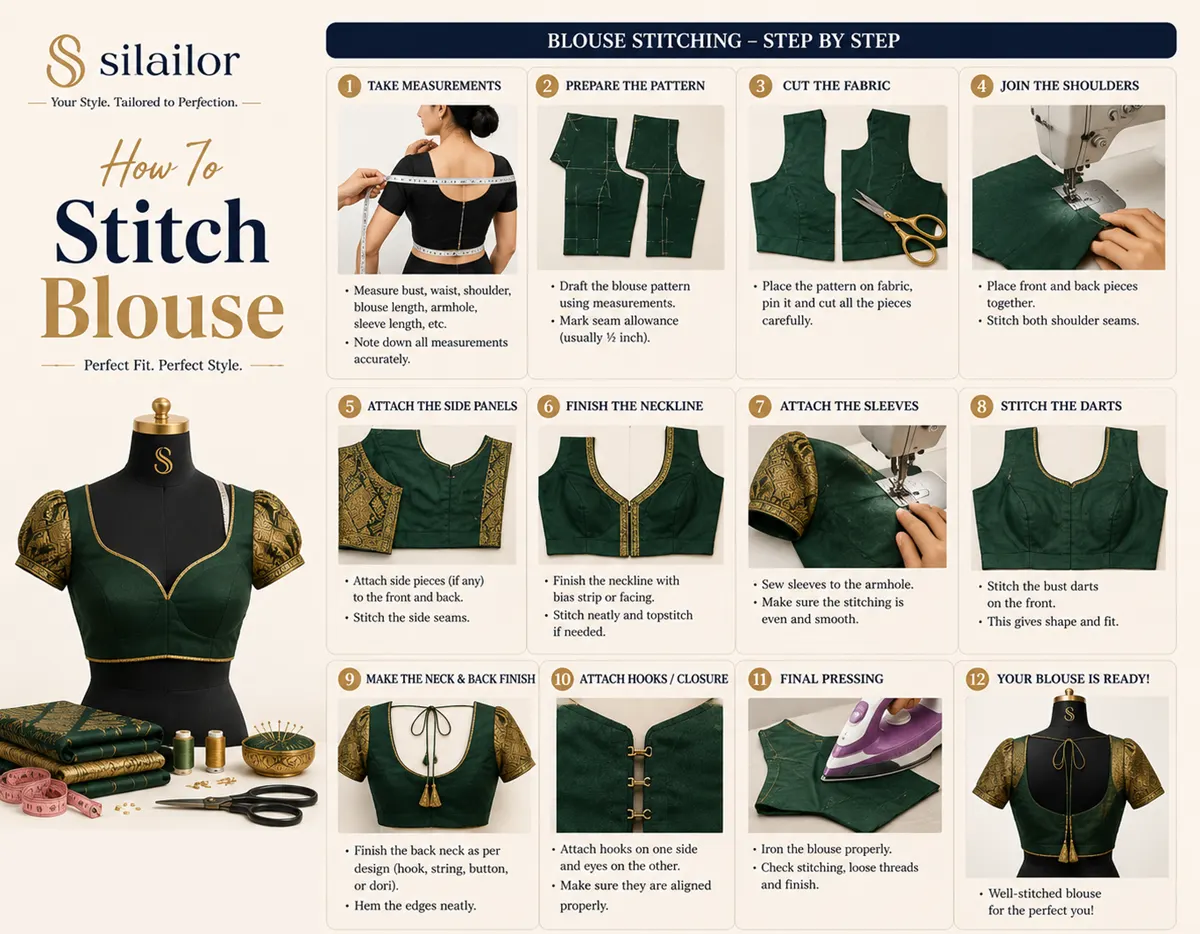
Simple Blouse Cutting and Stitching – Step-by-Step Guide
Stitching a blouse involves three major steps: sketching the blouse design, stitching the blouse, and adding embellishments. In this section, we will walk you through each step of the process.
1 – Sketching
Sketching a blouse design to stitch involves four major steps:
- Making a croquis, a human figure on which designers draw their designs, is the first step in drawing a blouse design. The croquis can be slim or tailored to any body type.
- The second step is to draw the basic shape of your blouse on the croquis, deciding on its length, fit, and style. Asymmetrical, off-the-shoulder, and t-shirt styles are just a few examples of the various blouse styles. The blouse can be loose, somewhat fitted, or stretchy, and length options include cropped and tunic-length.
- Sketch the sleeves, back, and neck of the blouse to add more details to the design. Decide on the neckline, such as sweetheart, halter, scoop, square, v-neck, or criss-cross. Choose the sleeve length and type, including sleeveless, cap sleeve, short sleeve, 3/4-length sleeve, or long sleeve. Additionally, think about the back of the blouse, whether it will be closed or open, and if you want any cutouts or a particular style, like a deep V-back.
- The fourth and final step is to select colors, textures, and embellishments to complete the blouse design. Choose the fabric for the blouse and decide on any embellishments, such as beads or jewels. You should also consider the closures you’ll use to secure the blouse, such as buttons or zippers.
2 – Sewing
Stitching the blouse involves five major steps:
- Measure the bust, waist, hips, and arms to determine the desired size of the blouse.
- Create a pattern using your measurements and design. Use pattern paper to cut templates for each piece: front, back, sleeves, and neckline. Mark any darts or special details on the pattern for easy blouse cutting step by step.
- Cut the fabric using the pattern. Pin pattern pieces onto the fabric and cut along the edges. Use sharp fabric scissors to avoid jagged edges.
- The fourth step is to pin and sew the blouse pieces together. Pin the pieces together, ensuring the right sides are facing each other. Sew along the edges of the pieces with a straight stitch, about 0.5 in (1.3 cm) from the raw edges. Remove the pins as you sew.
- And finally, flip the blouse inside out and trim any loose threads after sewing all the pieces together.
3 – Adding Embellishments
Adding embellishments to the blouse involves four steps:
- Attach closures like buttons, snaps, or zippers to secure the blouse. Hand-sew buttons and snaps, and use a sewing machine for zippers.
- Add pockets as embroidery for a functional touch. Hem pocket edges before sewing onto the blouse.
- Embroider sleeves, neckline, or bottom. Use complementary threads to create intricate designs such as flowers, squiggly lines, or other patterns.
- Attach gems, beads, or chains with fabric glue to the neckline, sleeves, or back opening for added intricacy. Allow the glue to dry overnight.
Conclusion
In conclusion, sewing a blouse is a fun and rewarding job that allows you to create a personalized piece of clothing. I hope that by following the steps outlined in this article, you can make a beautiful blouse that fits perfectly and showcases your unique style.
Out of top 10 ladies tailors in Delhi, Silailor takes immense pride in being considered the best. Check out their latest prices for custom-made blouses
